Guidance on using the CQLS queuing system
The CQLS queuing system
Queuing systems allow for multiple users to make use of multiple compute nodes
across an infrastructure. At the CQLS, we log in to the
shell.cqls.oregonstate.edu machine, currently called vaughan. From vaughan,
users can submit batch or array jobs (1 or many tasks, respectively) to the,
queuing system such that they run autonomously, and will continue running even
when users log off.
Reading pre-requisite
Please see this previous post with some information regarding the CQLS infrastructure along with some of the commands that are a part of the SGE queuing system.
How does one use the queuing system?
The CQLS is currently using the Son of Grid Engine (SGE) queuing system. To
facilitate the use of the queuing system, the CQLS wrote and maintains two
helper scripts for job submission: SGE_Batch and SGE_Array.
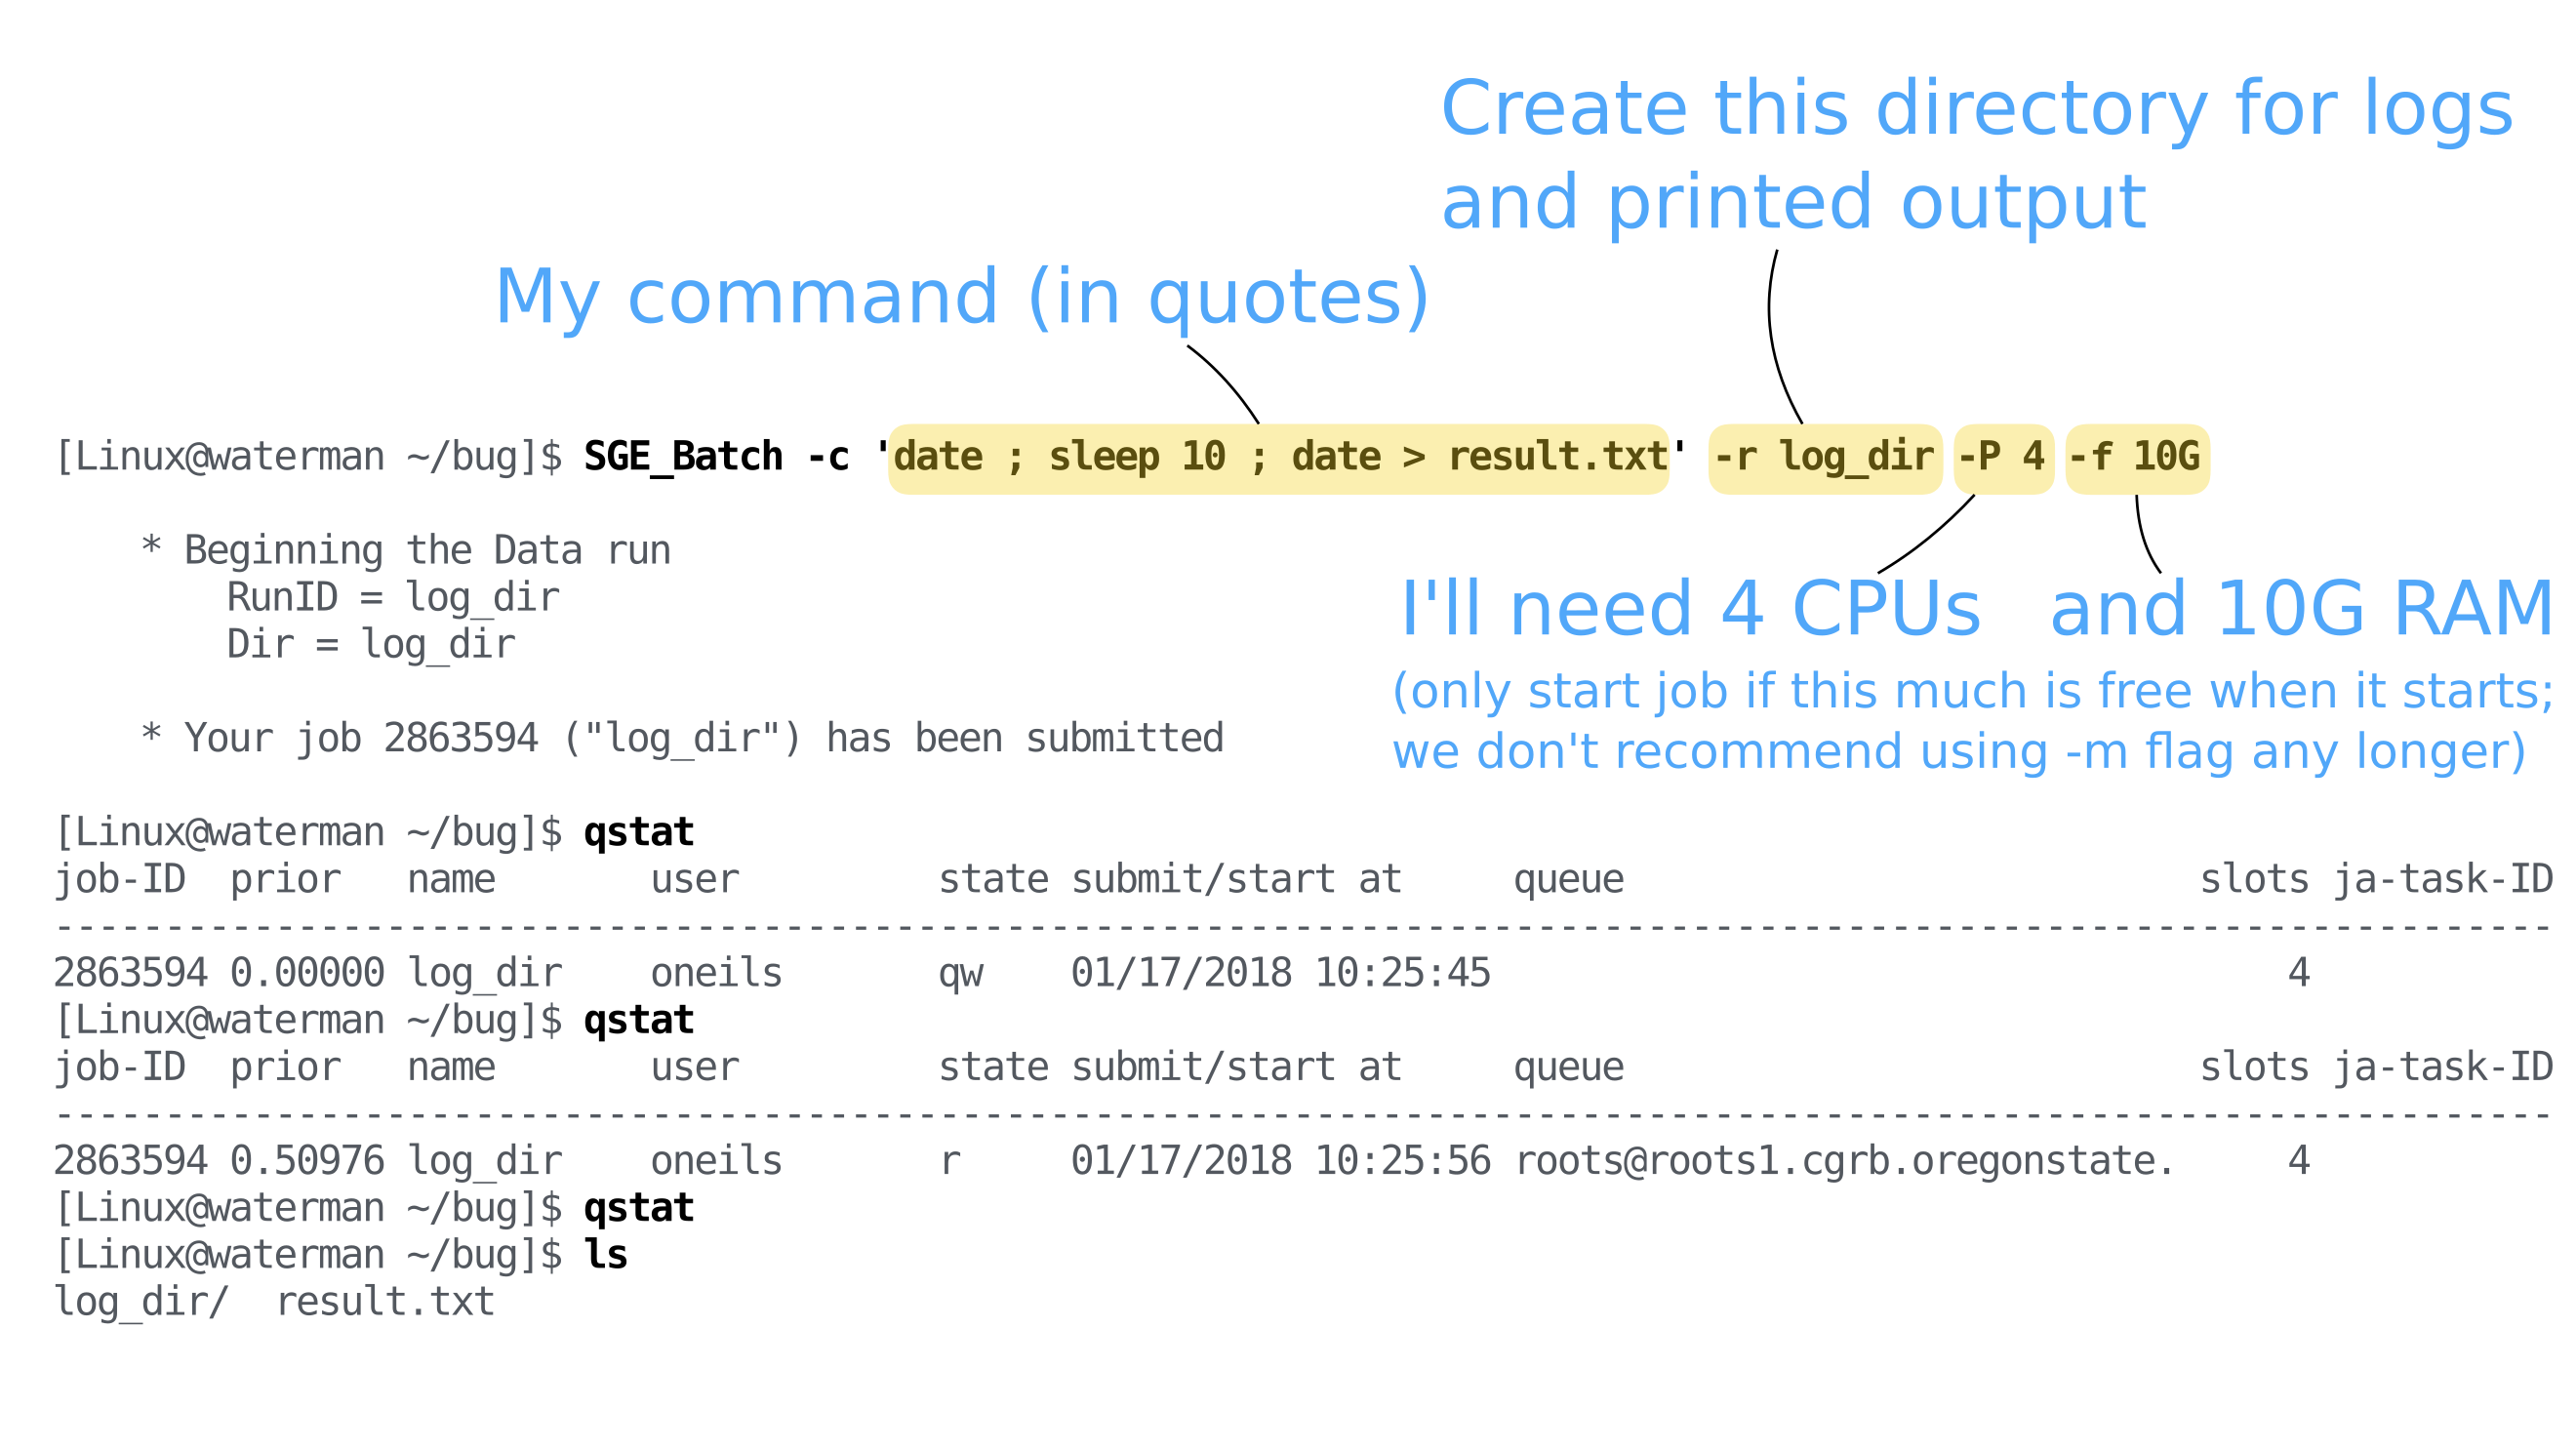
SGE_Batch is designed to support a job submission with individual tasks (one
can submit array jobs using SGE_Batch, but we recommend using SGE_Array),
while SGE_Array is designed for submitting array jobs including multiple
tasks.
These wrapper scripts write a shell script to the filesystem and submit a job to
the queuing system for you according to the options you requested. In the
background, the scripts call the qsub command for you with the shell script.
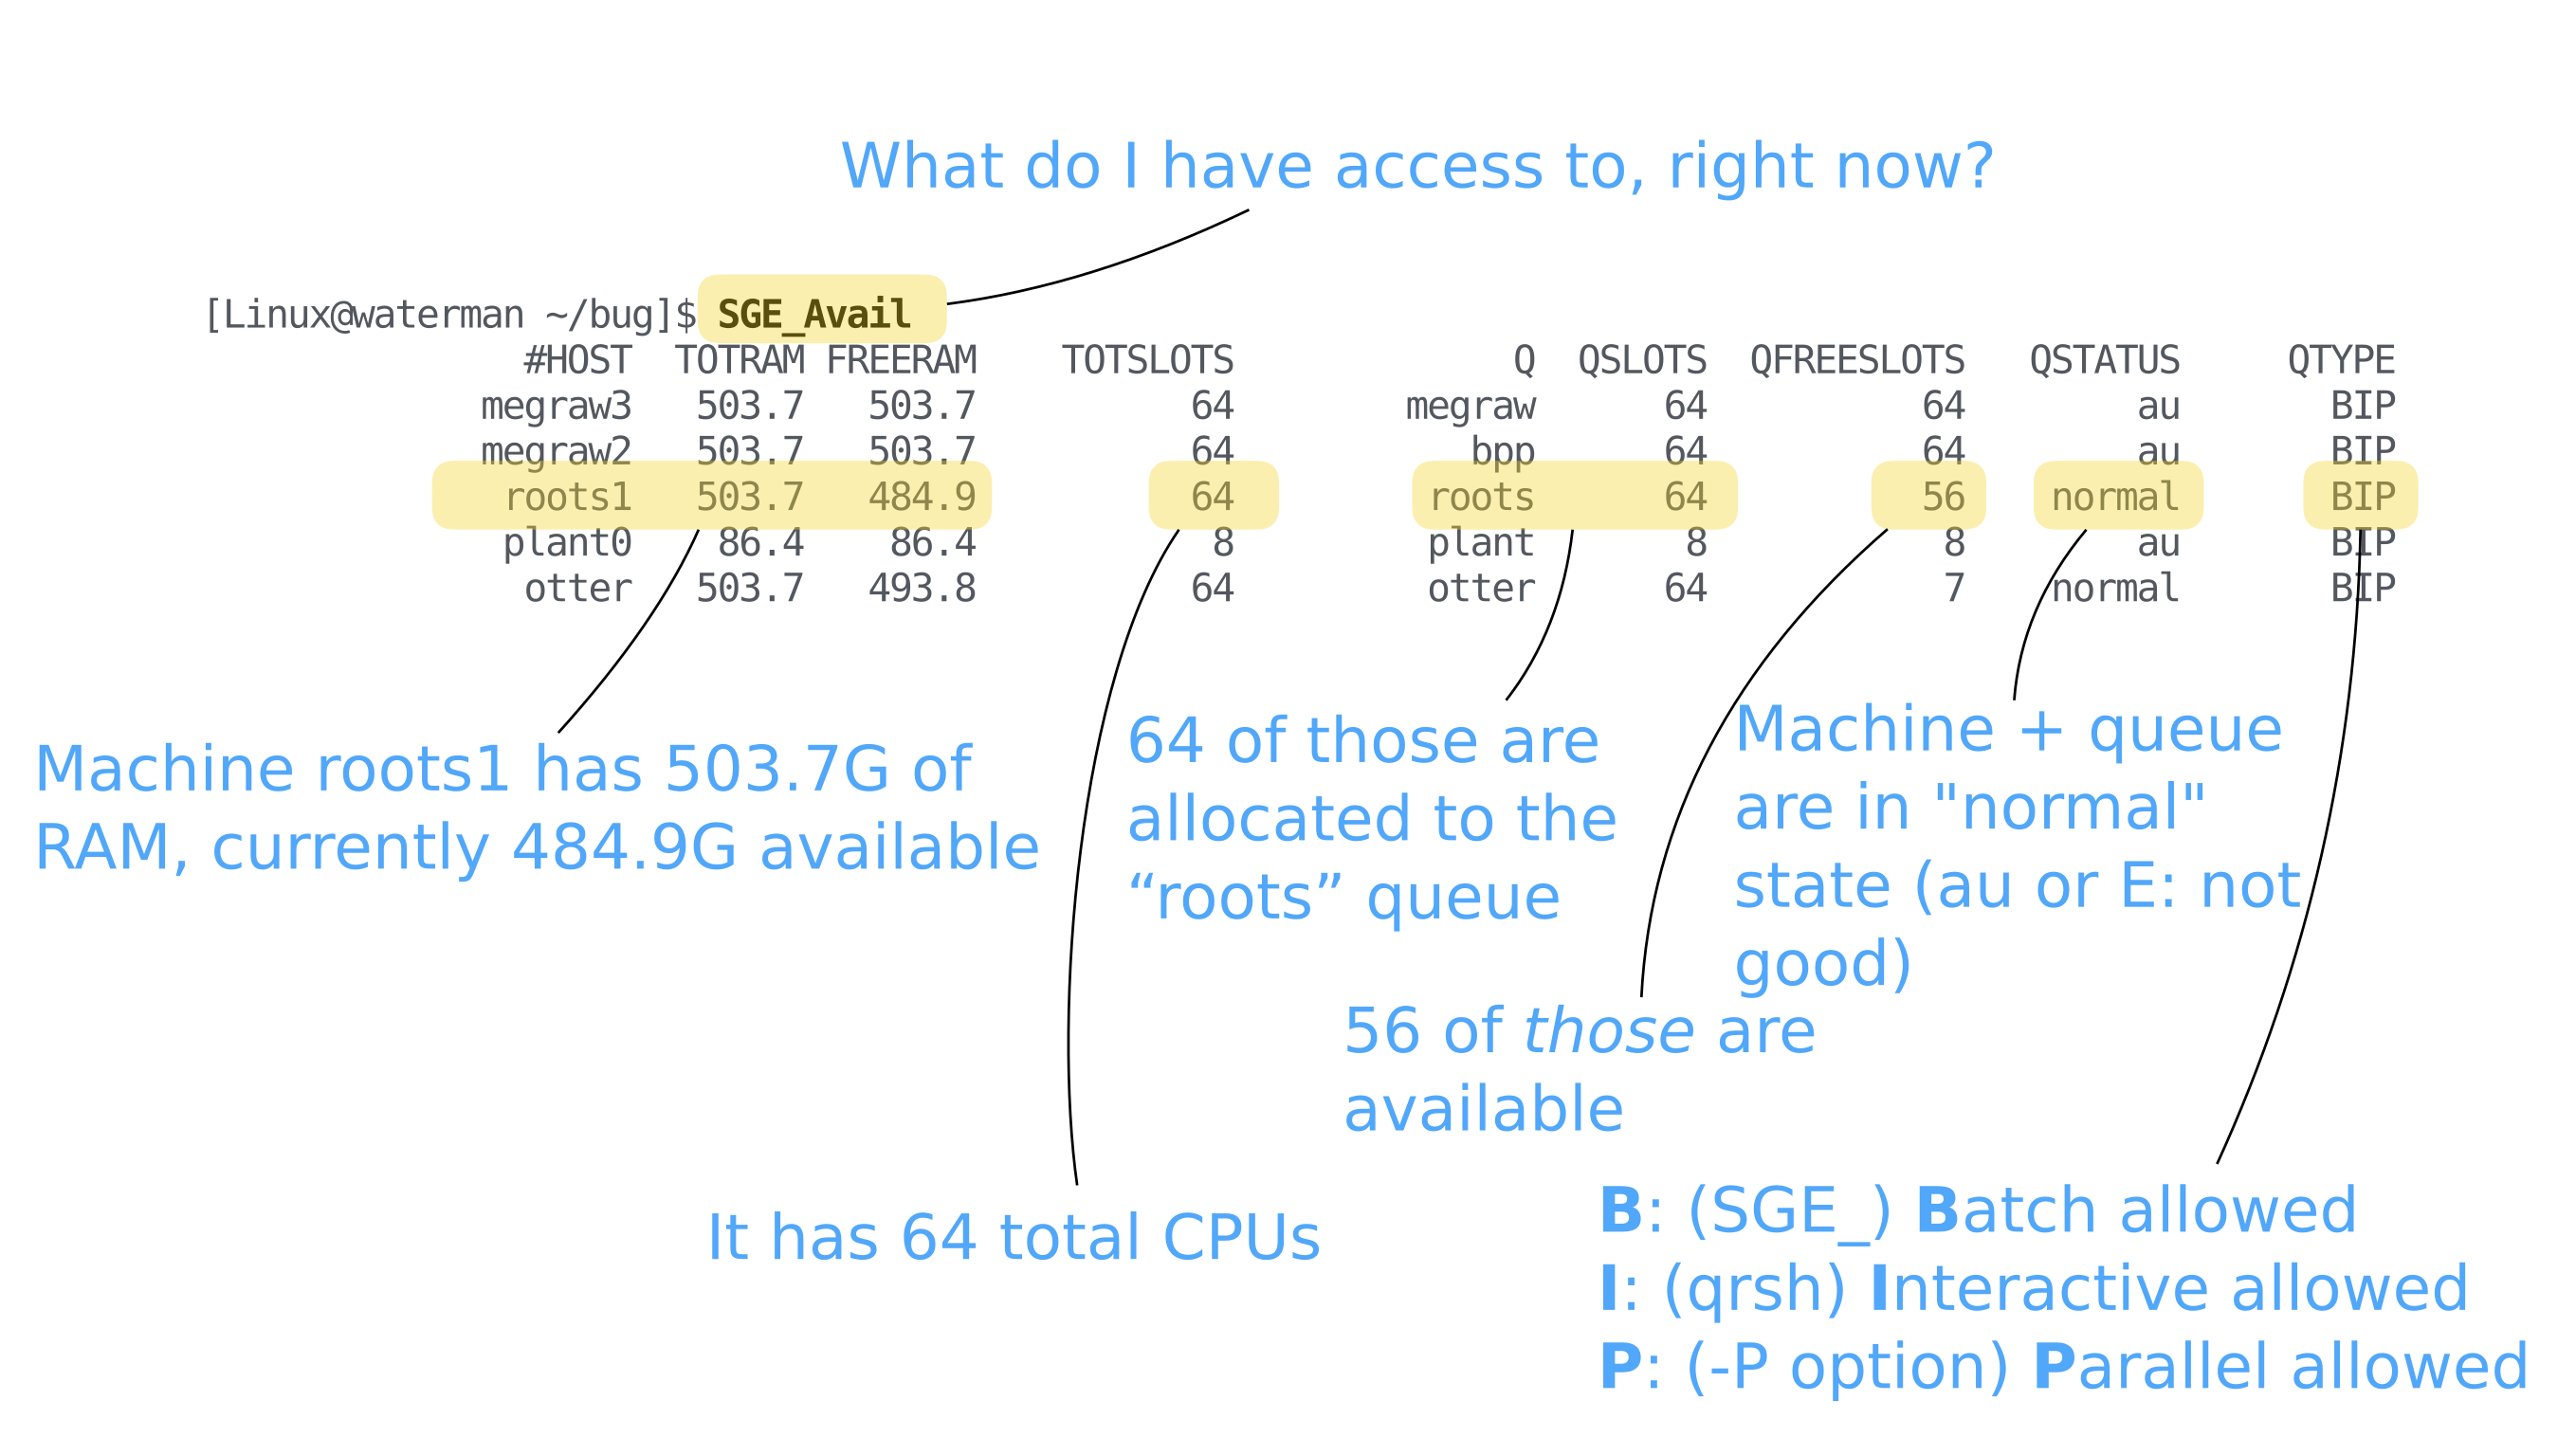
To see what resources are available to you, use the SGE_Avail script. To
monitor currently running jobs, use qstat, and to kill jobs, use qdel. See
the above post linked above for more information regarding these underlying
commands.
To check out a node interactively, use the qrsh command. You can specify a
-q QUEUE where QUEUE is the name of the queue you’d like to check out a
node from. You can check out multiple processors on a machine using the
qrsh -pe thread N option, where N is the number of processors you need.
To land on a specific node on a queue, use the -q QUEUE@node syntax, where
QUEUE is e.g. bpp and node is e.g. symbiosis. This syntax can be used
with qrsh and the SGE_Array and SGE_Batch helper scripts.
Please make sure to exit the node when you are finished so that the queue can reclaim the processors for others to use.
Practical application
We’ve established what the queuing system is and what commands one can use to interact with the queuing system. Let’s put these scripts to use in some hypothetical scenarios that may be related to your own research.
Common considerations
Naming your jobs (run-name)
You must specify a run-name (-r flag) for each job that you submit. I suggest
using a syntax whereby each job submitted to SGE has a run-name prefix with
sge.; while using the infrastructure for 10+ years, I have had to find
different ways to deal with having these run directories in my various
workflows. What I found is that having the directories always prefixed with
sge. allows me to identify them even in a directory full of other input and
output files.
Additionally, if one uses sample names as part of the run-names, one might find
that there are errors whenever a sample name starts with a number. This is
because numbers are disallowed in the run-names by SGE. Therefore, prefixing all
run-names with sge. will alleviate this issue.
I also generally suggest including the program that one is running in the run-name.
Therefore, a standard syntax that one might adopt is sge.ProgramName_SampleName.
This will also help identify what jobs are running more easily when one runs
qstat, although the names sometimes do get cut-off in that output.
You can run the qstat-long command to get the full names for jobs.
When you submit a job, it might be useful to use the watch qstat command to
monitor the job progress until your job enters the r (i.e. running) state.
Matching command settings and SGE settings
SGE does not and cannot know what settings you applied to your commands in terms
of CPU and/or memory utilization. Therefore, whenever you are submitting a
command to the queue, it is a good idea to set your number of CPUs or threads
(often using the --threads or -t option, this will be program dependent) and
the -P option of SGE_Batch or SGE_Array. Setting a higher value of -P
will not make your program automatically use more threads. Furthermore, setting
the number of threads of your program to a higher value without the corresponding
change to -P will cause the server to be overloaded.
Standard output and standard error
Your standard output and error will end up in the run-name directory that you
specify on job creation. The STDOUT will be in the files with the .o$RUNID
suffix and the STDERR will be in the files with the .e$RUNID suffix.
Generally, it’s useful to specify your output to go to a file, either using
STDOUT redirection (i.e. command > output.txt) or using the program specific
flag (e.g. command -o output.txt) instead of pulling the output from the
.o$RUNID files.
Use the local /data drives on compute nodes
In order to speed up computation and reduce the network congestion, it can be
useful to specify the local /data drive as input or output for your commands.
If you are running a command from a /nfs or /home directory, then both the
reads and writes to disk will happen over the network. With processes that are
especially heavy on input/output (I/O), this can cause slowdowns and disk waits
that will reduce efficiency of both your own processing and others using the
same compute nodes as you.
One common high I/O process is genome assembly using short reads, like the
SPAdes genome assembler. The authors of
this software suggest using local hard drives, like /data, for processing
using SPAdes. At minimum, it will be useful to specify the output directory on
the /data drive. For the most speed-up, you can also copy the input files to
the /data drive as well, prior to assembly job submssion. NOTE: You will
have to remember which node you copied the reads over to and the output was
written to so that you can copy the outputs off afterward.
Some programs also allow you to specify a temporary directory to write
intermediates to, and do not always use the $TMPDIR environment variable as
default, so it can be useful to specify the temp dir as /data manually when
that option is available.
SGE job states listed using qstat
The common SGE job states are:
| Category | State | SGE Letter Code |
|---|---|---|
| Pending | pending, queue wait | qw |
| Pending | pending, holding (for other job) queue wait | hqw |
| Running | running | r |
| Running | transferring | t |
| Suspended | suspended | s |
| Error | all pending states with error | Eqw, Ehqw |
| Deleted | all running and suspended states with deletion | dr, dt |
The most commonly seen states will be qw of queue wait and r of running.
At times, you might find an E state (along with other codes) that indicates
some issue with job submission. You can run qstat -j $JOBID for that job and
figure out why that job has an error (grep for error and you will find the
appropriate line).
Sometimes you can use the clear_Eqw_job.sh script to clear the errors and the
will continue as submitted, but often you have to kill and resubmit the jobs.
If you find jobs stuck in the d state, the node you are trying to delete the
job on is likely waiting for disk I/O and is unresponsive. The node may need
to be restarted.
SGE_Avail queue states
| State | SGE Letter Code | Note |
|---|---|---|
| alarm | a | Too many resources being used (load average too high) |
| unreachable | u | Machine is offline or off network |
| Error | E | Transfer and/or network error most often |
| normal | normal | All is well |
If a queue is in error state, you can run qstat -explain E to find more
information about the error. If you see au or a state, you can run
qstat -explain a (or qstat -explain aE for both). The -explain flag can be
limited by -q flag as well to get information about specific queues.
qstat -explain aE | grep -B 1 -e alarm -e ERROR shows all E and a state
messages.
Individual job submission
There are several different ways to successfully submit a job through SGE_Batch.
The two most common methods are:
- Include the bare command in quotes as the
-coption toSGE_Batch(as above) - Write the commands in a bash script (e.g.
run.sh) and submit the bash script as the-coption (e.g.SGE_Batch -c 'bash ./run.sh' ...)
For one-off commands, I think the utility of the bare -c command is obvious
because of the ease of use and quick access.
For jobs as part of a larger analysis, it may be useful to include the commands
in a bash script, thus saving a record of what you ran and making it easier to
re-run the commands in the future. In addition, if you are on a node
interactively, using qrsh, you can run the command in the bash script without
having to retype the command or scroll through your command history.
An additional benefit of using a shell script to store your commands is that it is easier to run commands serially, e.g.
|
|
when compared to running several SGE_Batch -c 'command'... after the previous
job finishes.
Finally, if you need to use a piece of software that is in a conda environment, you can include the commands to activate the environment in the bash script.
|
|
In this way, you can record what conda environment needs to be activated for the program to work properly.
Multiple job (task) submission
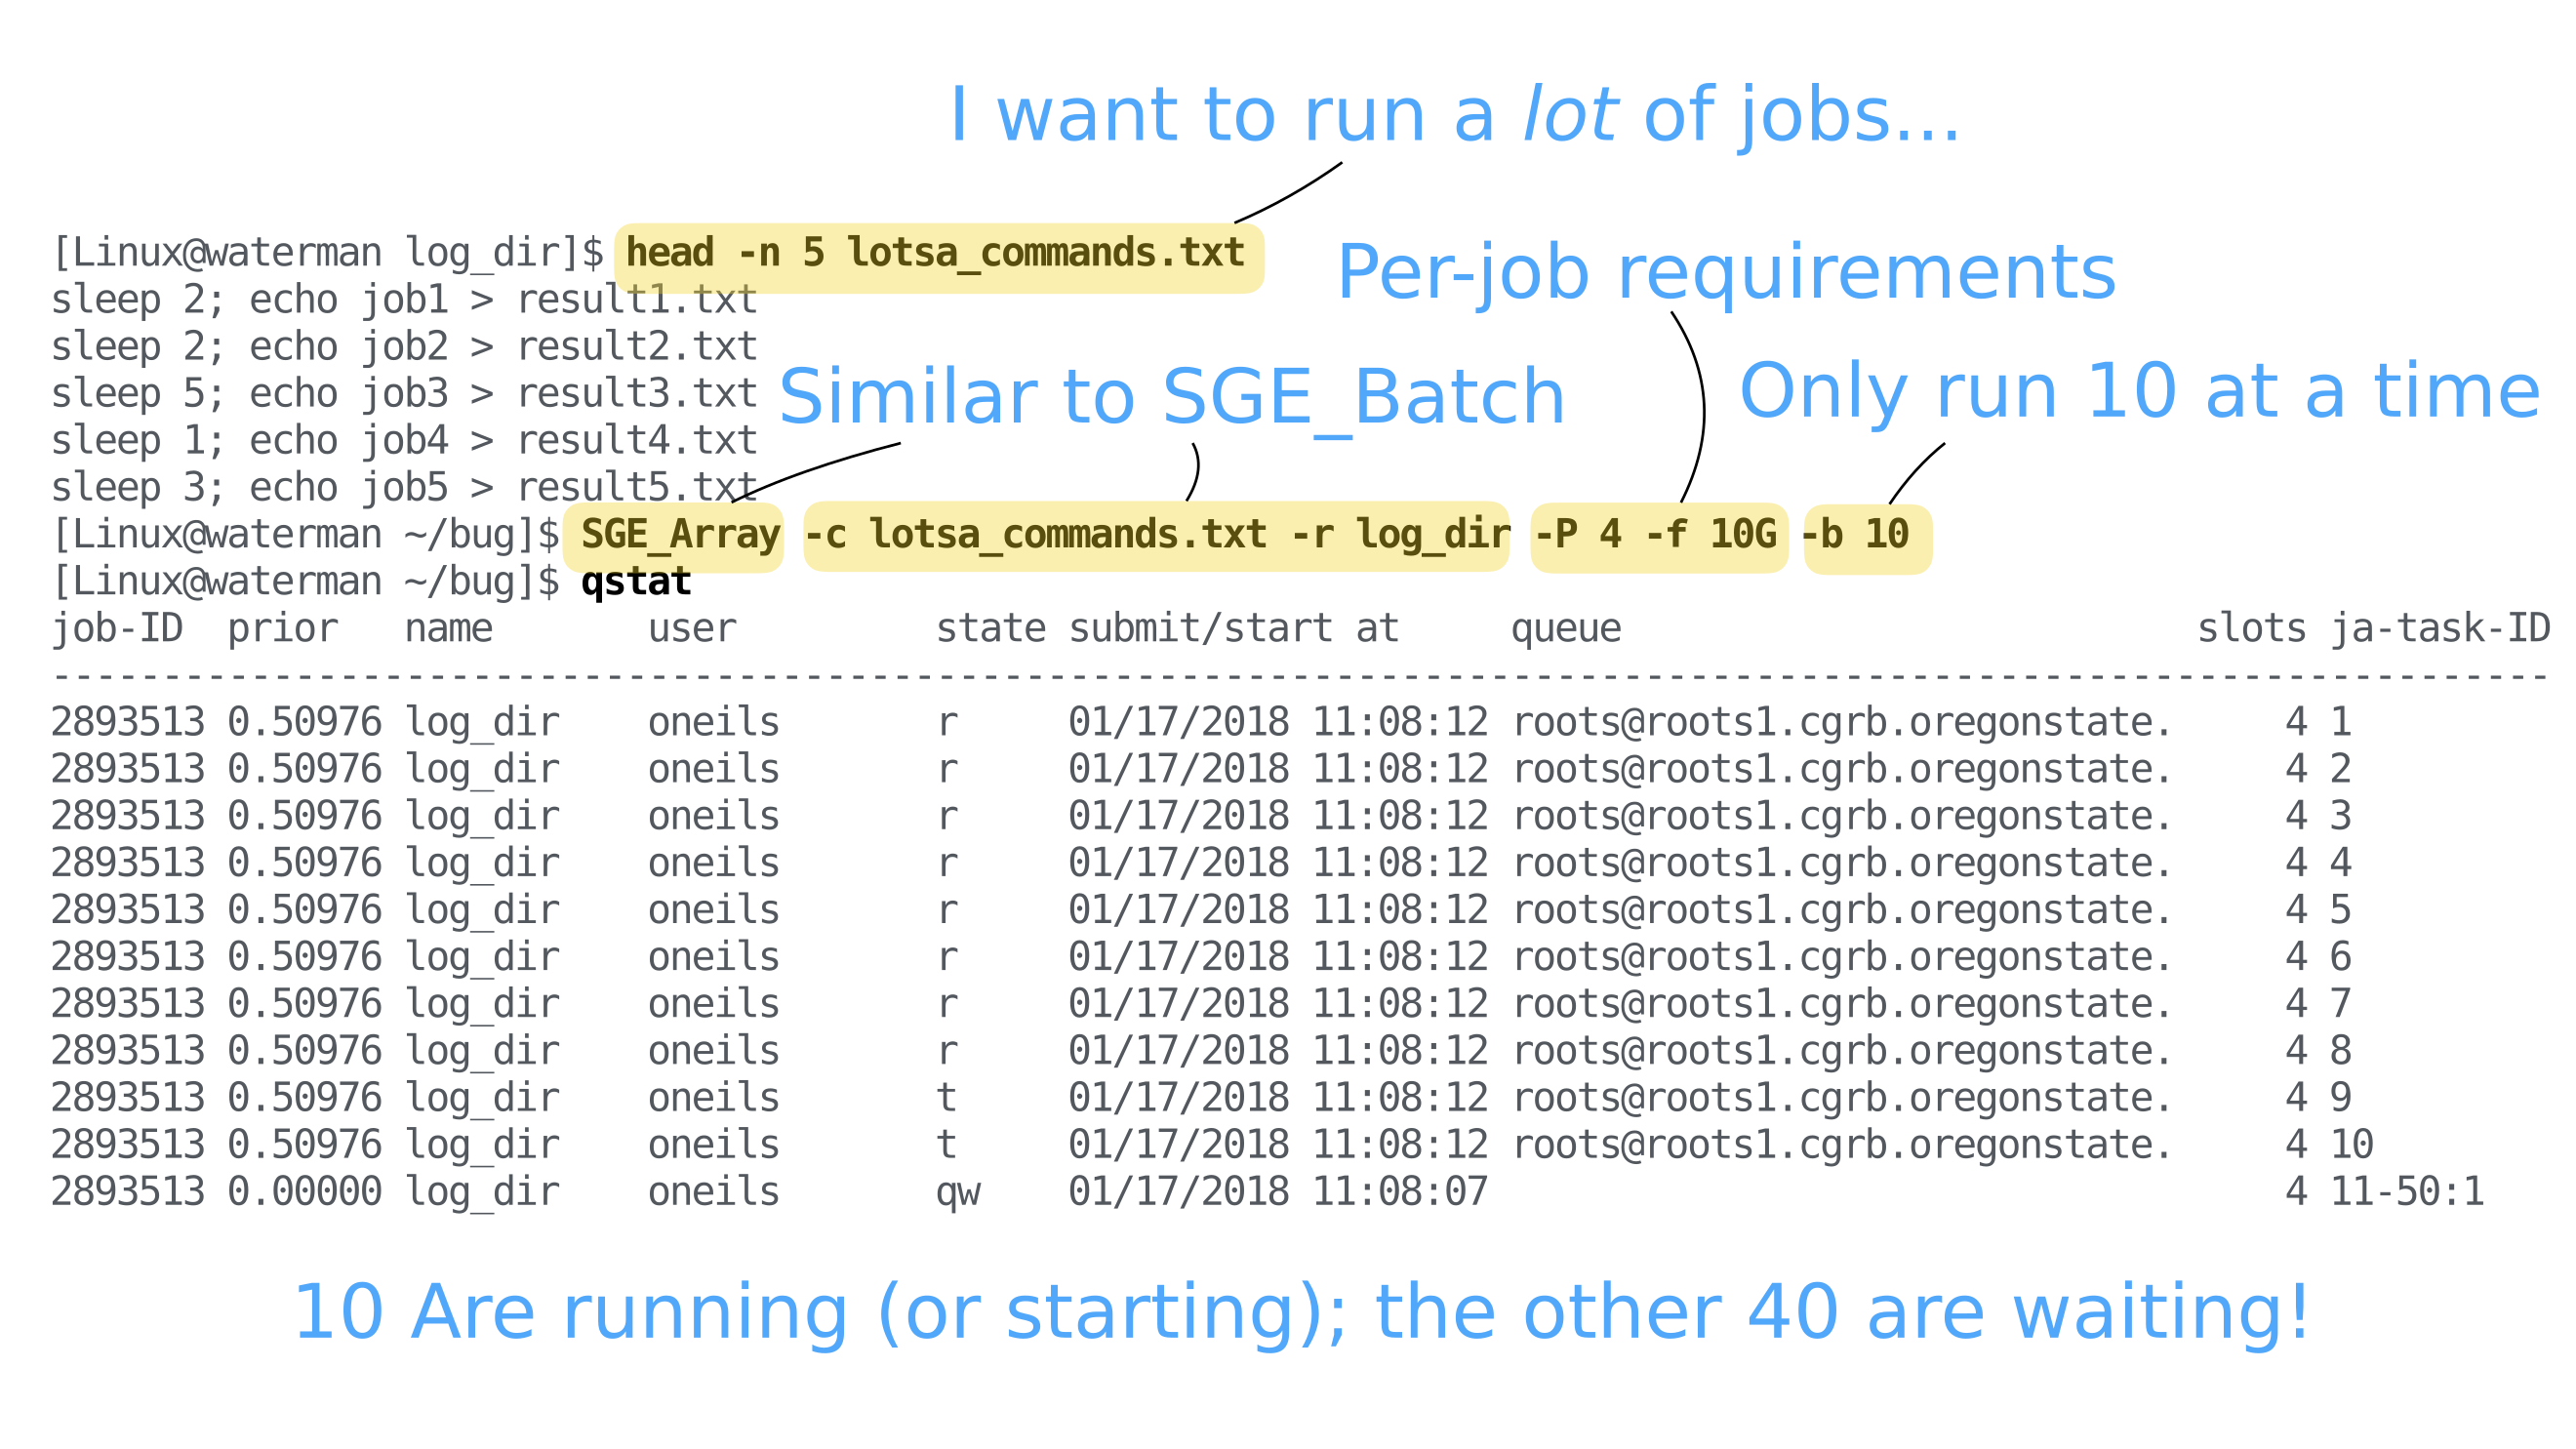
As with many workflows, you may have multiple files to process through the same
program. This will be the case with any project where you have multiple samples.
Instead of submitting multiple (thousand) SGE_Batch commands, it can be useful
to organize your job submissions using SGE_Array instead.
SGE_Array allows you to submit a single job that includes mutliple tasks (in
SGE terminology) that will be grouped. This can be especially useful when doing
some sort of large comparative genomics project with thousands of individual
tasks - you can group the tasks in a single job and not take over the entire
infrastructure by using the concurrency flag (-b; 50 by default). As a general
rule, if you are using a lot of resources per job, you can limit your concurrency
to a smaller number so others can use the infrastructure. Conversely, if your
jobs finish quickly and are unlikely to stay in the queue for a long period
(say, > 24h), then you can increase the concurrency flag to speed up the
processing.
Let’s assume you have some predicted proteomes (NCBI .faa format) and you want
to characterize their predicted functions using interproscan. Here is one way
you could run them all through using SGE_Array.
Here is our directory structure:
|
|
Here is the contents of run.sh:
|
|
You’ll note that this just runs echo to print the commands to the terminal,
which is a good thing because it allows you to check your command before you
submit it. For example, while writing this tutorial, I neglected to include the
-i $faa at the end of the command such that I did not provide any input files
to the command.
Let’s give the script a try:
|
|
So far so good. Now we can submit the jobs using SGE_Array, which takes STDIN
as the commands as default.
|
|
One nice feature of SGE_Array is that you will get an automatic run-name if you
do not provide a run-name with the -r flag. The downside is you will have to
examine the command.N files inside the directory to figure out what you ran.
Let’s take a look at the SGE directory:
|
|
Each of the command.N.txt files corresponds to the commands taken in as input
on the commandline when you submit the SGE_Array command (all of which are
found in the commands.txt file).
The jobname.oJOBID.N and jobname.eJOBID.N files corresponds to the stdout
and stderr of each task, respectively.
Advanced topics
While you can get by with the above commands and protocols, there are other ways that one can use the queuing system as well.
bash scripting for automation
One method for automating the job submission process takes two distinct steps:
- Writing a shell script that includes the program, options, env vars, and activating conda envs
- Writing a shell script to pass all input files through the script using SGE.
e.g.
|
|
|
|
Then, to submit the commands to SGE
bash ./submit_bakta.sh | SGE_Array -P 16 -q ...
or, to preserve a record of the commands
|
|
or, if you don’t need to run multiple jobs at once, and can run them serially
|
|
or…
|
|
Using this two step approach is flexible, as you can see.
snakemake pipelines
Snakemake is a job running system that can be configured to submit jobs through SGE. The snakemake system is too large of a topic to cover here, however, here is some information that might get you in the right direction.
default cluster config:
|
|
job specific config:
|
|
submission script:
|
|
Using the just command runner
I have recently taken to using the just command runner for my analysis, and other, jobs. One difficulty I’ve experienced over the years of bioinformatics work is keeping track of individual commands that I have run. For me, making each and every command as a shell script to keep a record of what I’ve done has not been possible or even desireable.
One of the main tasks that we have to deal with is converting files between
formats. While there are tools that can assist us in this, often we end up using
a pipeline of grep, awk, sed, cut, and paste to join our commands
together.
While using just doesn’t completely eliminate barriers to writing the commands
in a file, it certainly has the benefit of not cluttering the working directory
with shell scripts. All commands can be contained in a file called justfile and
then can be invoked using just $command, as might be expected when selecting
options from any program. Further, arguments can be provided (and defaults set)
so that you can re-use your justfiles if desired.
While there is some syntax and language-specific syntax to be learned (mainly,
commands are submitted from the directory the justfile is in rather than the
pwd), you can use just similarly to your standard bash scripts except that
you get a command-line parser built in for you.
Real world example
Rather than re-writing the documentation that you can find by following the link above, I’ll walk you through a scenario from today.
Here is my directory structure (some files removed for readability):
|
|
I needed to run a genome hashing algorithm so I could compare some complete and incomplete genomes and later cluster them based on the hash distance.
Here is the justfile I wrote:
|
|
You’ll see some parameters at the top, and then three commands, the default, which
just lists the available commands, and then run-dist and convert.
This is what you see when you run just on the command line:
|
|
The default command is hidden because it is prefixed with and underscore in the
justfile.
I was then able to submit the run-dist command in this way:
SGE_Batch -c 'just run-dist' -q bact -P 16 -r sge.run-dashing-dist
Since I was unfamiliar with the outputs, I used qrsh to check out a node and
navigate to the directory where the outputs were. I realized I needed to modify
the output files, and instead of running the commands individually, I wrote
the convert command above. Then, I could just run the command using
just convert from the commandline. Since I had a node checked out, I did not
have to worry about taking up too many resources (although the convert command
could easily run on vaughan as well).
Additionally, I was able to re-run the run-dist command with several -k
settings and examine the outputs just by changing the options in the justfile.
One could extend this idea using the
bash scripting for automation section above,
and have a run-command recipe that has the commands necesary for running the
command, and a submit-command recipe that echos the command so it’s easy to
run through SGE; I’ve done this in the past and it has been helpful. You can
run recipes while in other recipes, making this set up even easier.