The CQLS infrastructure and you
Preface
So you’ve requested an account on the CQLS infrastructure and have the account information email in your inbox and you don’t know where to start. Well, you’re in the right place!
Get familiar with the CQLS infrastructure policies before you begin your journey.
Ideally, you would have a more senior member of your lab or maybe another grad
student in your department to go to for the ins-and-outs of the infrastructure.
If you don’t, fear not, because this document should have all of the information
and resources that you need to become the wisened senior lab member yourself!
Either way, if your professor has file space and/or compute nodes on the
infrastructure, you need to have them either send an email to Chris Sullivan
with your name and the username that you signed up for or submit a support
ticket with that information here:
Support Request <– That will gain
you access to the biocomputing resources you need.
NOTE This document sources the wonderful ‘Primer for computational biology’ written by our own Shawn O’Neil. You can find that book here: https://open.oregonstate.education/computationalbiology/
I will point you to the most relevant passages to get you up and running the quickest, but feel free to browse other sections as you find them helpful.
Assumptions
I’m going to assume that 1) you know how to connect to the infrastructure using ssh in some form and that 2) you know how to type commands and navigate a command-line interface. If these are unfair assumptions, you can register for a course/workshop or utilize these other resources:
- Introduction to Unix/Linux and Command-Line Data Analysis taught by Matthew Peterson
- Contact a CQLS trainer or analyst for some one on one training
- Join the CQLS-BUG mailing list or Slack channel and ask for help - OSU-CQLS-BUG slack channel,
- Check out the section about logging in to an infrastructure from the bioinformatics primer
If you are on Windows 10, I would recommend installing the Linux subsystem for Windows as described here: https://docs.microsoft.com/en-us/windows/wsl/install-win10 with Ubuntu 18.04 LTS as the recommended Linux distribution. The reason for this over say, PuTTY, is that you will be able to install native Linux programs on your own computer such that the experience will mirror that of the infrastructure. You can also practice using the command-line and command-line tools on your own computer, as well as practice coding in python, perl, etc much easier than in Windows 10. ssh should be installed by default, and you can use the bash shell to get access to it.
Other alternatives are the venerable PuTTY, terminus, or something like the new Microsoft Terminal with the new built-in SSH client, if you don’t want to go all-in on the Linux subsystem.
Connecting to the CQLS infrastructure
When you sign up for an account, you will receive instructions on how to connect to the infrastructure. Do NOT lose these instructions, as the instructions have key pieces of data that you will need to successfully login in the future. Follow the instructions to connect and change your password. If you aren’t familiar with the command-line at all, take some time to familiarize yourself with this information from the primer -> the command line and filesystem
Here are some good commmand-line tips & guidelines: https://github.com/jlevy/the-art-of-command-line
Here is a site for novice bioinformatics users: https://astrobiomike.github.io/unix/
You will log in to the shell.cqls.oregonstate.edu machine, which is also known
as vaughan:
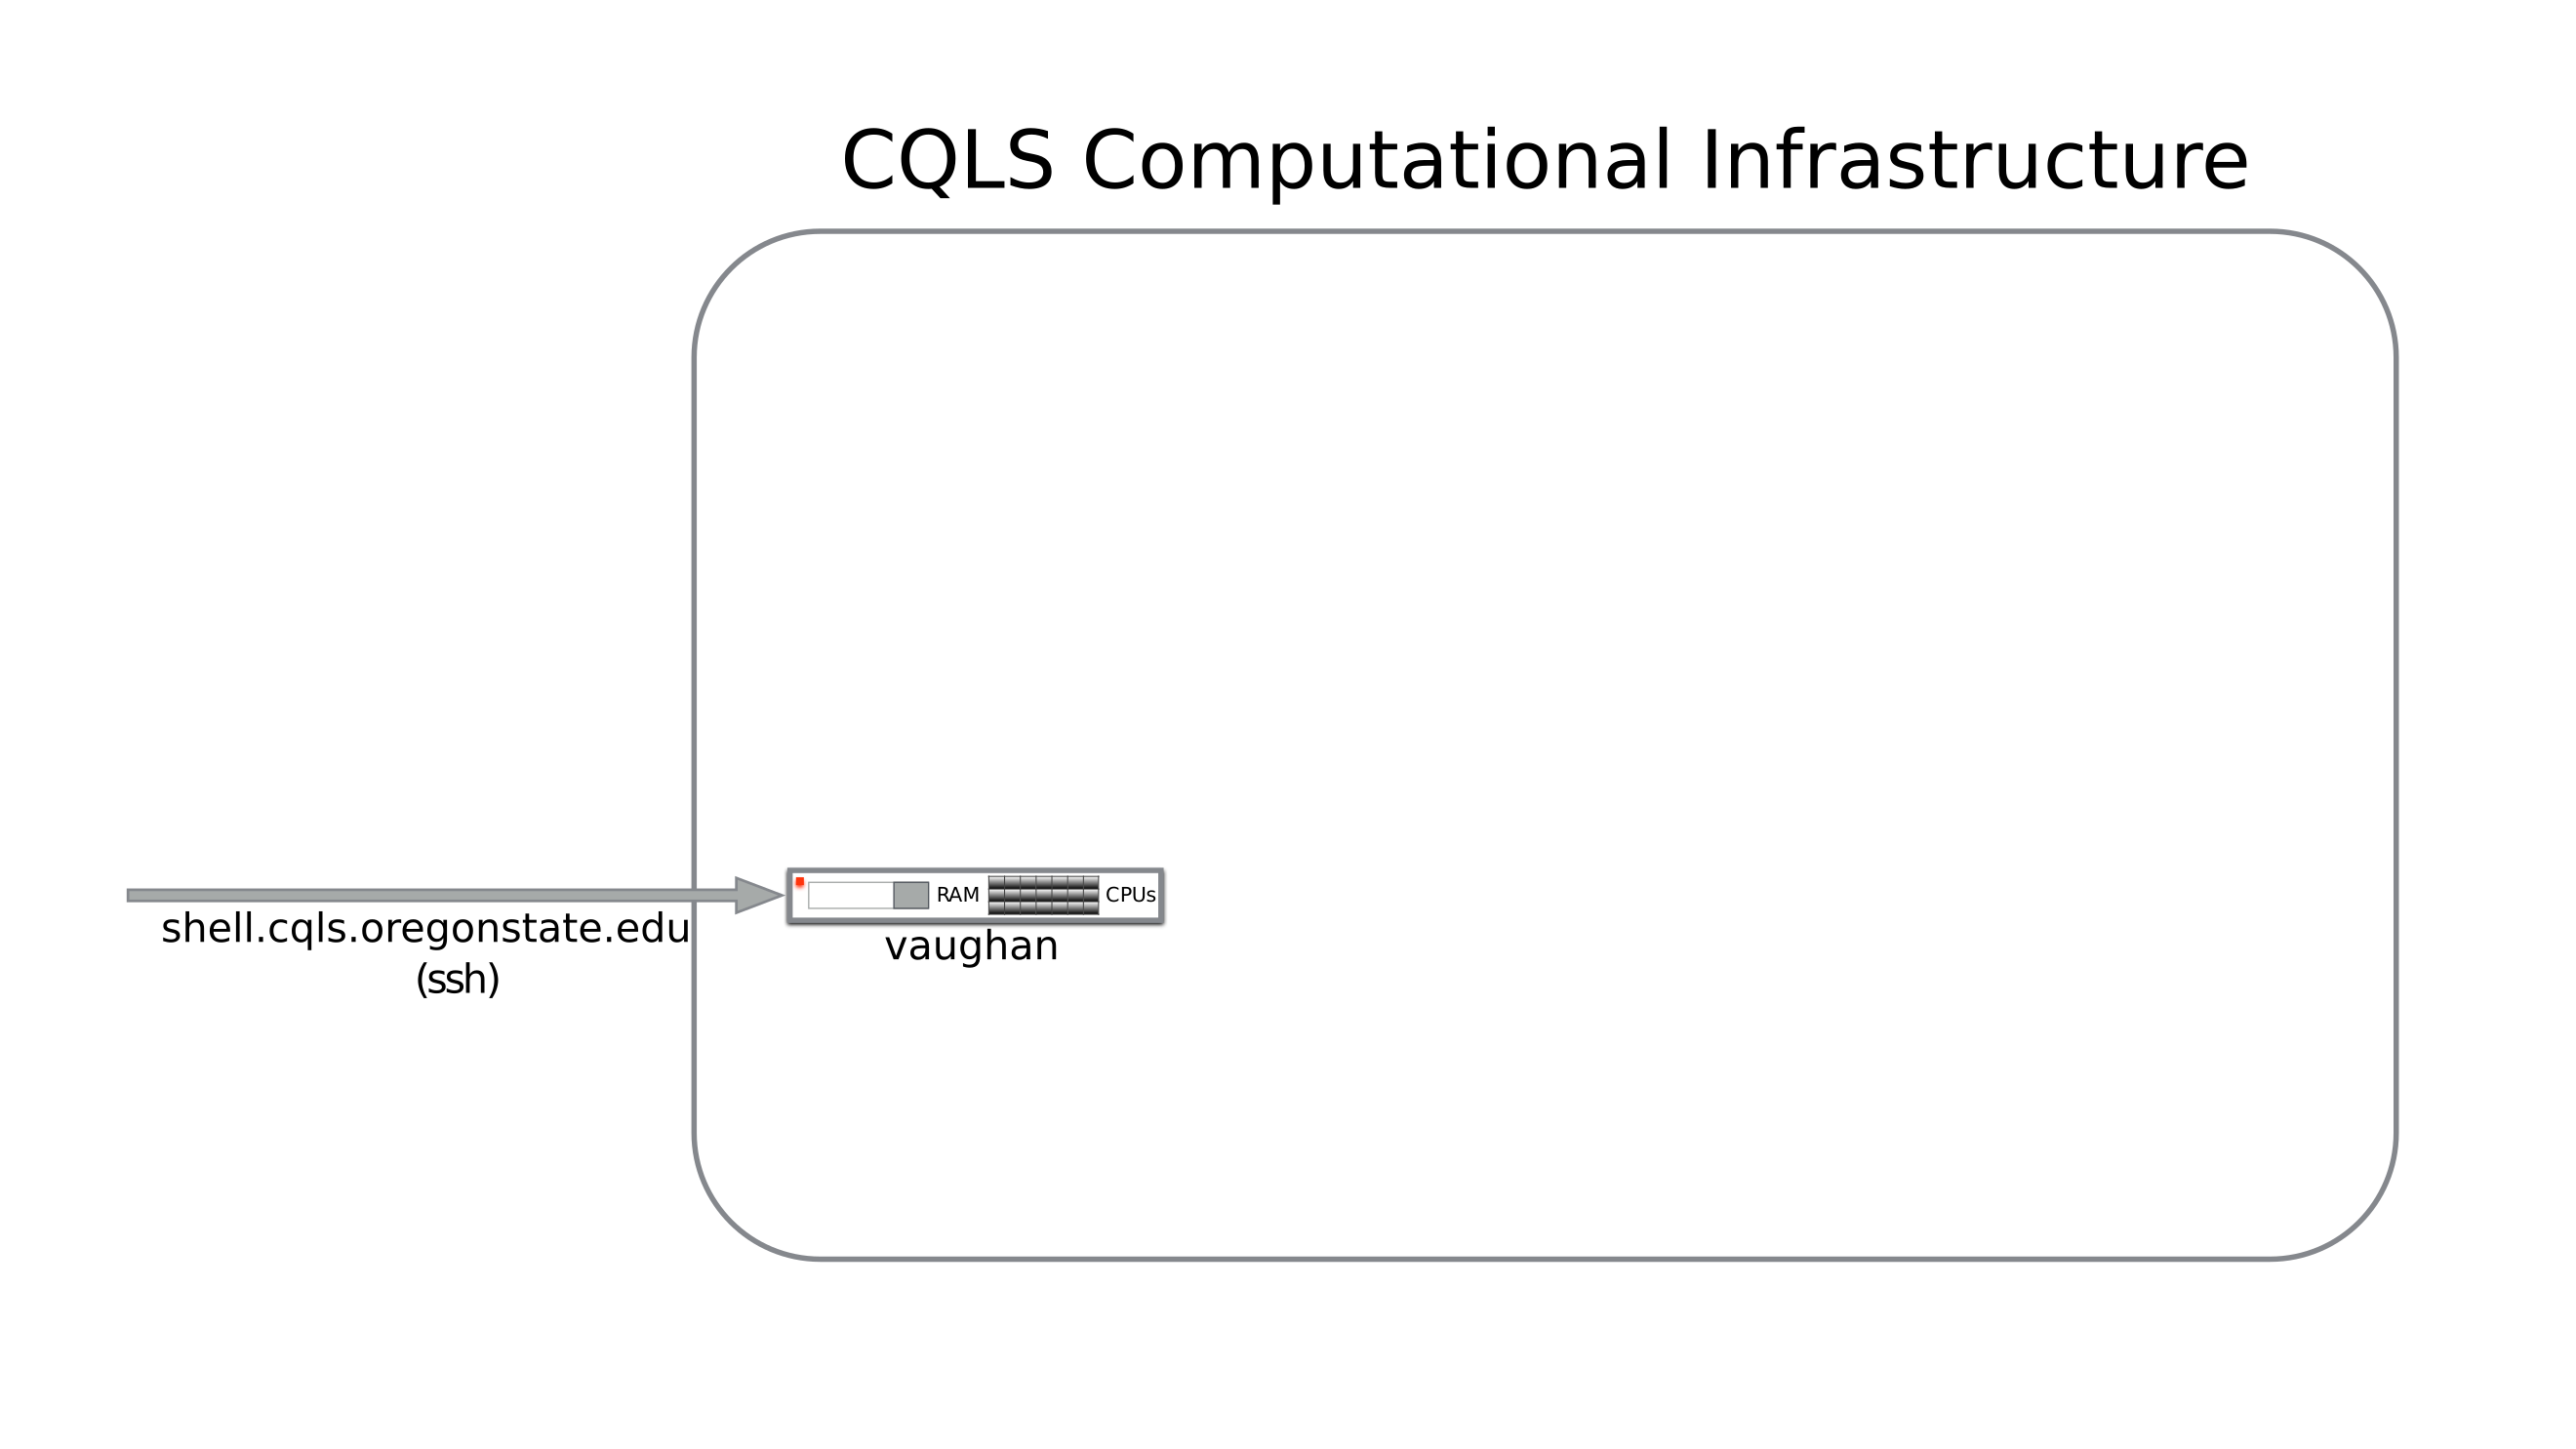
This machine is named after Dorothy Johnson Vaughan (September 20, 1910 – November 10, 2008) who was an American mathematician and human computer who worked for the National Advisory Committee for Aeronautics (NACA), and NASA, at Langley Research Center in Hampton, Virginia. In 1949, she became acting supervisor of the West Area Computers, the first African-American woman to supervise a group of staff at the center.
On login, you will be in your home directory on the infrastructure.
|
|
Each of the networked volumes is stored on a separate file server.
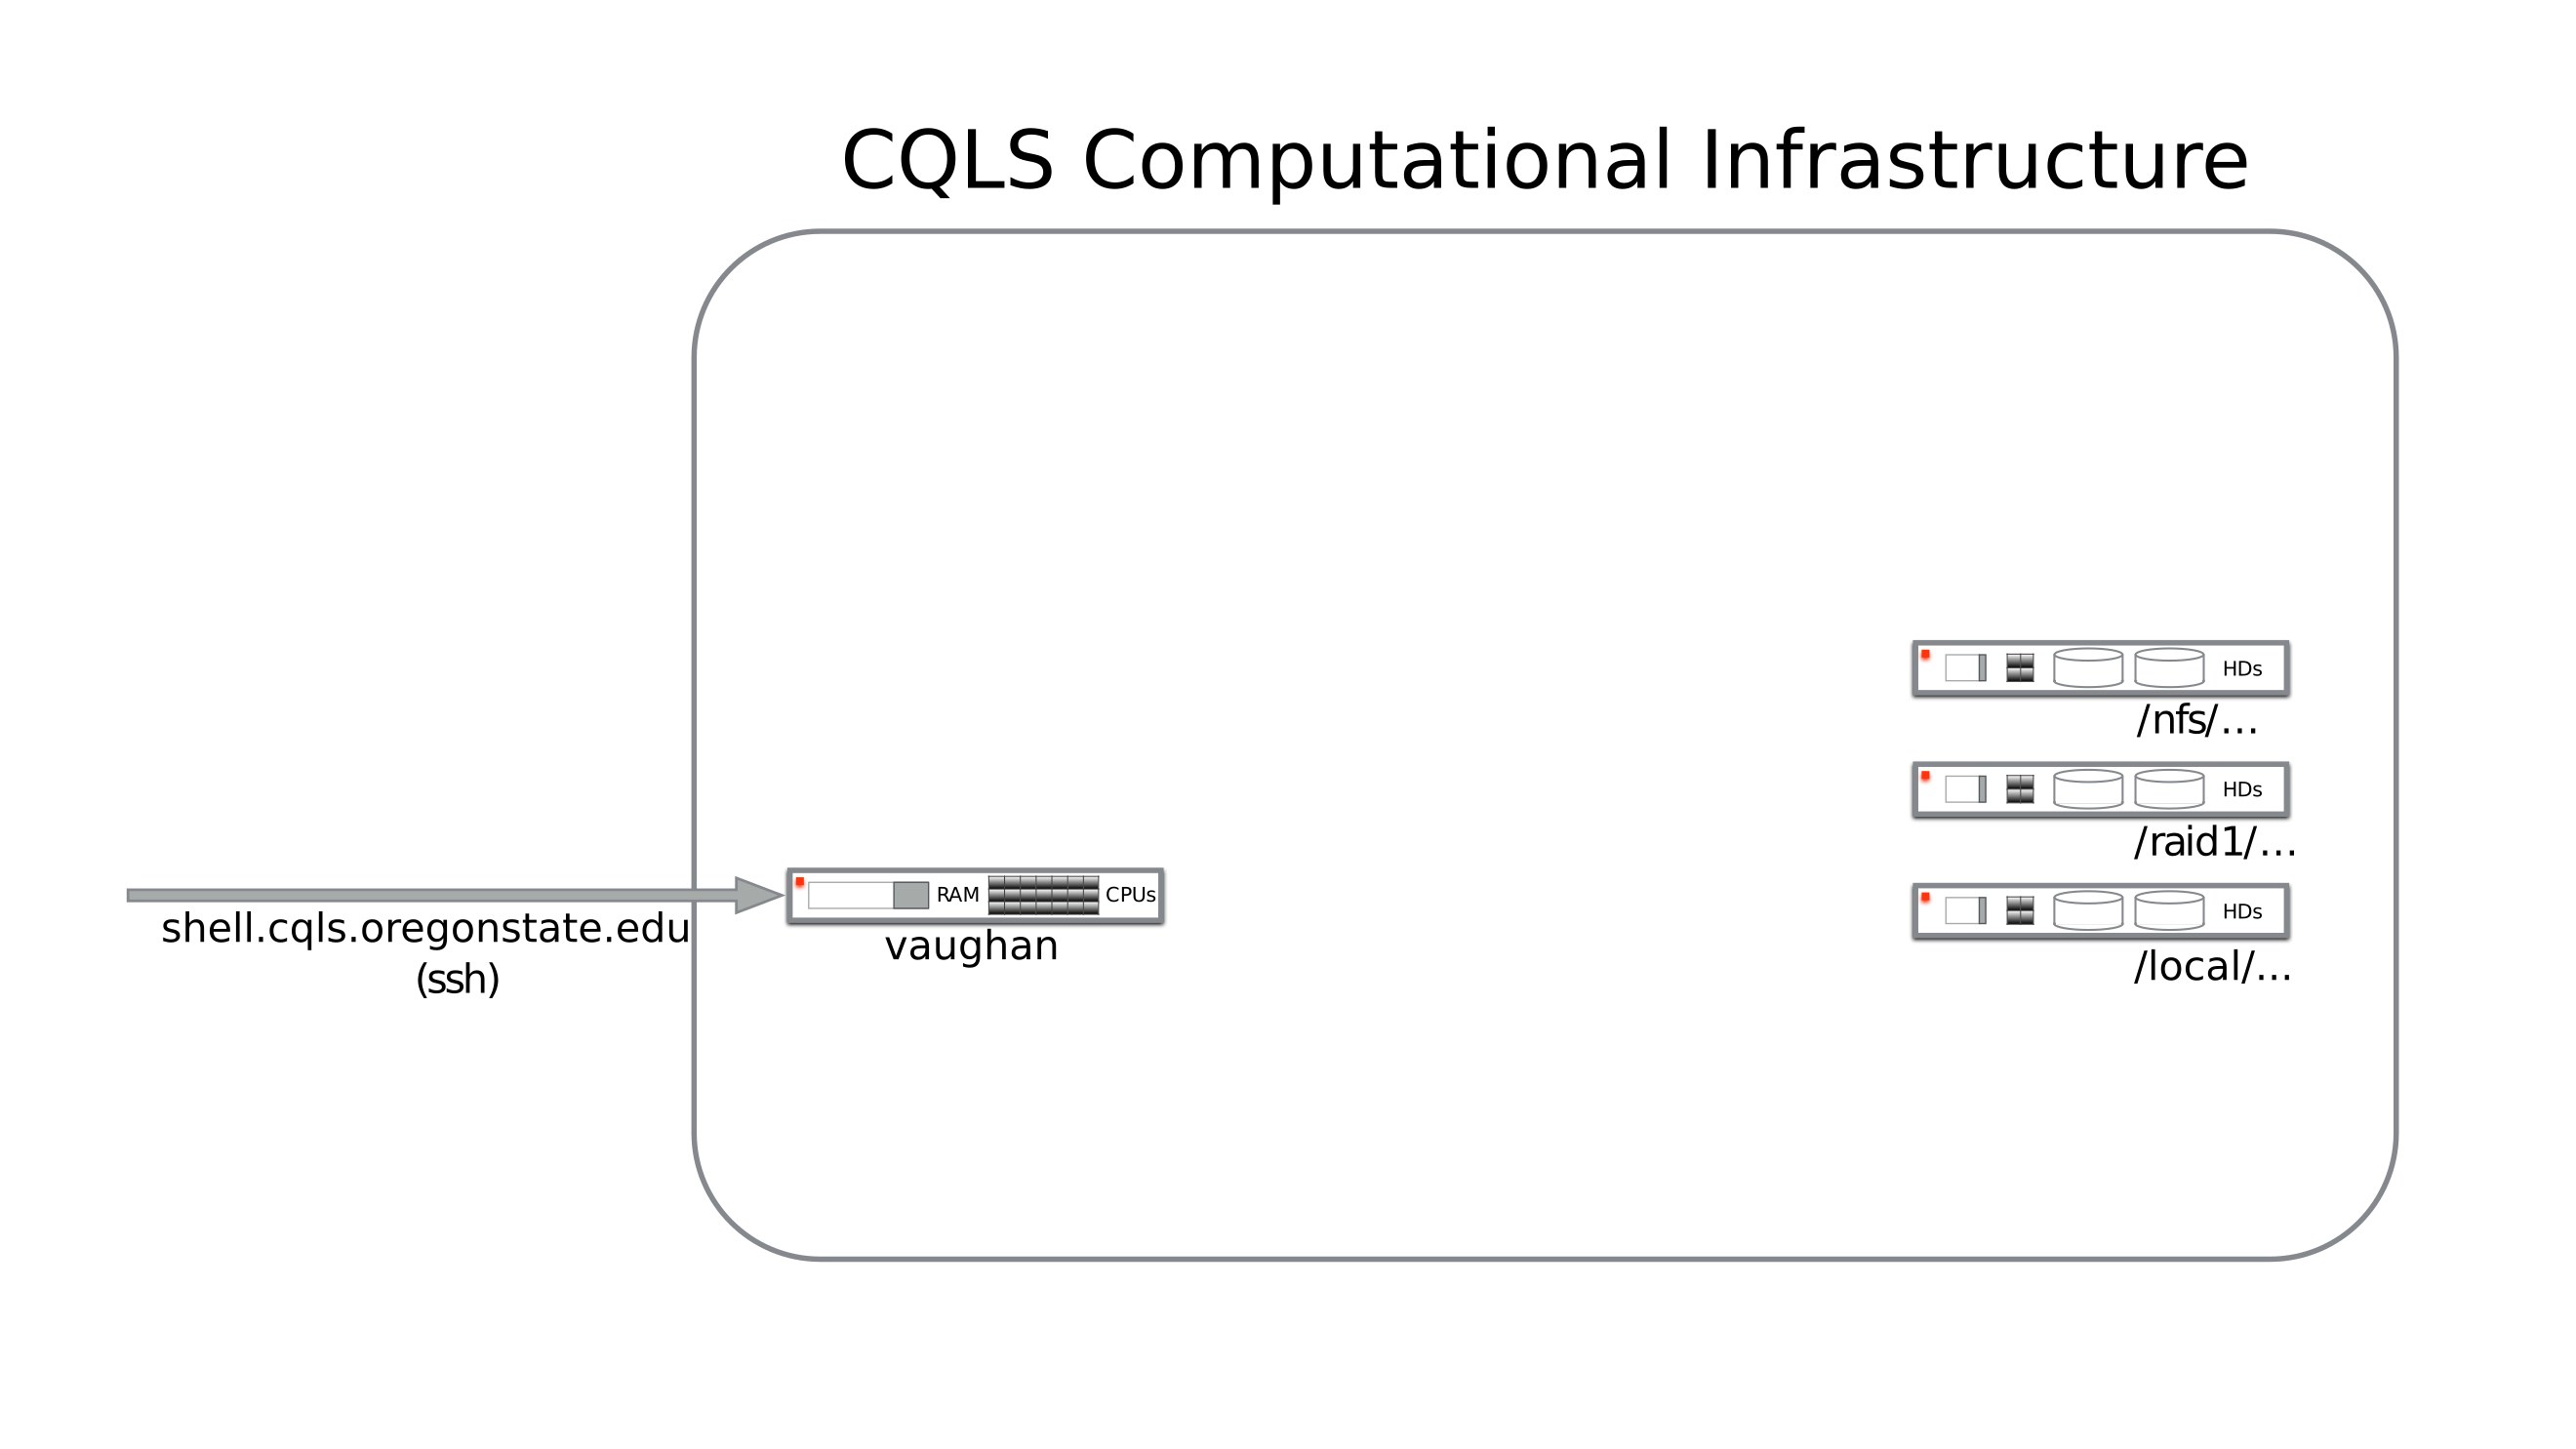
You have 25G of space in your home directory, which is not very much once you start generating raw sequencing data or downloading a lot of data from NCBI. As mentioned above, if your professor or department has filespace purchased already, you should have had them submit a request to get you access to those resources as well.
Generally, these lab or department directories will be somewhere such as:
|
|
or more generically:
|
|
Each lab space will be managed differently by the members of the lab. In general, each lab member will have a designated folder in their lab space where they put their files, programs, and projects.
In order to help you manage your projects, we have a program called git
installed that can save versions of your scripts as you write them. You can back
up your repositories made by the git command to our gitlab -
https://gitlab.cgrb.oregonstate.edu - This will help if you accidentally change
a file and need to recover it, or if you want to work on the same project from
different computers. NOTE: git is not a complete replacement for real
dedicated backups. git cannot save very big files and has some trouble with
directories with lots of smaller files. See the
version control with git
section of the primer for more information.
Contact Matthew Peterson about getting backups for your lab space running. We only charge for the space for backups; there is no extra cost to maintain or recover backups!
Making your navigation easier
There are several ways to get you into your lab’s directory from your personal home directory.
The three most common are:
- Setting a shell variable to the path of your lab directory
home=/path/to/lab/home- usage:
cd $home
- Making an alias that changes your directory to the lab directory
alias home='cd /path/to/lab/home'- usage:
home
- Linking the lab directory in your home, and then using that path along with
the tilde (~) shortcut to get home faster.
cd; ln -s /path/to/lab/home ./home- usage:
cd ~/home
Using one of these shortcuts will save a lot of time and energy over the long haul. For the record, I use the first set explained above in my daily routines, and it works the best for me. Since it’s a variable, I can use the shortcut for things other than just changing my directory as well, it’s available to any command that I type.
Where are my programs?
For the vast majority of commonly used programs, we will have a version
installed. Look at
this chapter
of the primer to learn more about permissions and the $PATH variable.
So, most programs will already be available to you when you log in, without
you needing to do anything. Pretty neat!
Additionally, even if you cannot find something in your $PATH, we
have other locations the program could be installed.
The first, is /local/cluster/bin. This directory may not be in your $PATH, and
so therefore the programs there would not be available for your shell to see
unless you specified the full path to the programs. The second place would be
/local/cluster/program or some variation of that, e.g.
/local/cluster/SPAdes for the SPAdes assembler.
If you still can’t find the program, submit a support ticket request here and someone should contact you in approximately 24-48, pending other requests. You can also submit tickets for program updates; it’s difficult to keep track of updating thouasands of pieces of software at once!
Additionally, you can maintain a set of some of your own software. We strongly encourage users to submit a request form, so that everyone can benefit from the program updates. If you are working on projects with other members of your lab, you could set up a shared program directory so that you could all use the same new programs.
Compiling a program from source is examined in
the primer.
I’d recommend calling your local program directory either ‘local’ or ‘opt’ ->
/nfs/DEPT/Lab/user/local or /nfs/DEPT/Lab/user/opt, and then adding the
‘bin’ dir one level below that to your path.
export PATH=/nfs/DEPT/Lab/user/local/bin:${PATH} for bash or
setenv PATH /nfs/DEPT/Lab/user/local/bin:${PATH} for tcsh (current default
shell)
You can add the export/setenv line to your .cshrc or .bashrc depending on
your terminal so that it will always be in your $PATH, even when you log out
and log back in. When you are installing new programs, then specify
--prefix=/nfs/DEPT/Lab/user/local and you will always get the programs
installed into your $PATH automatically.
Running jobs on the CQLS infrastructure
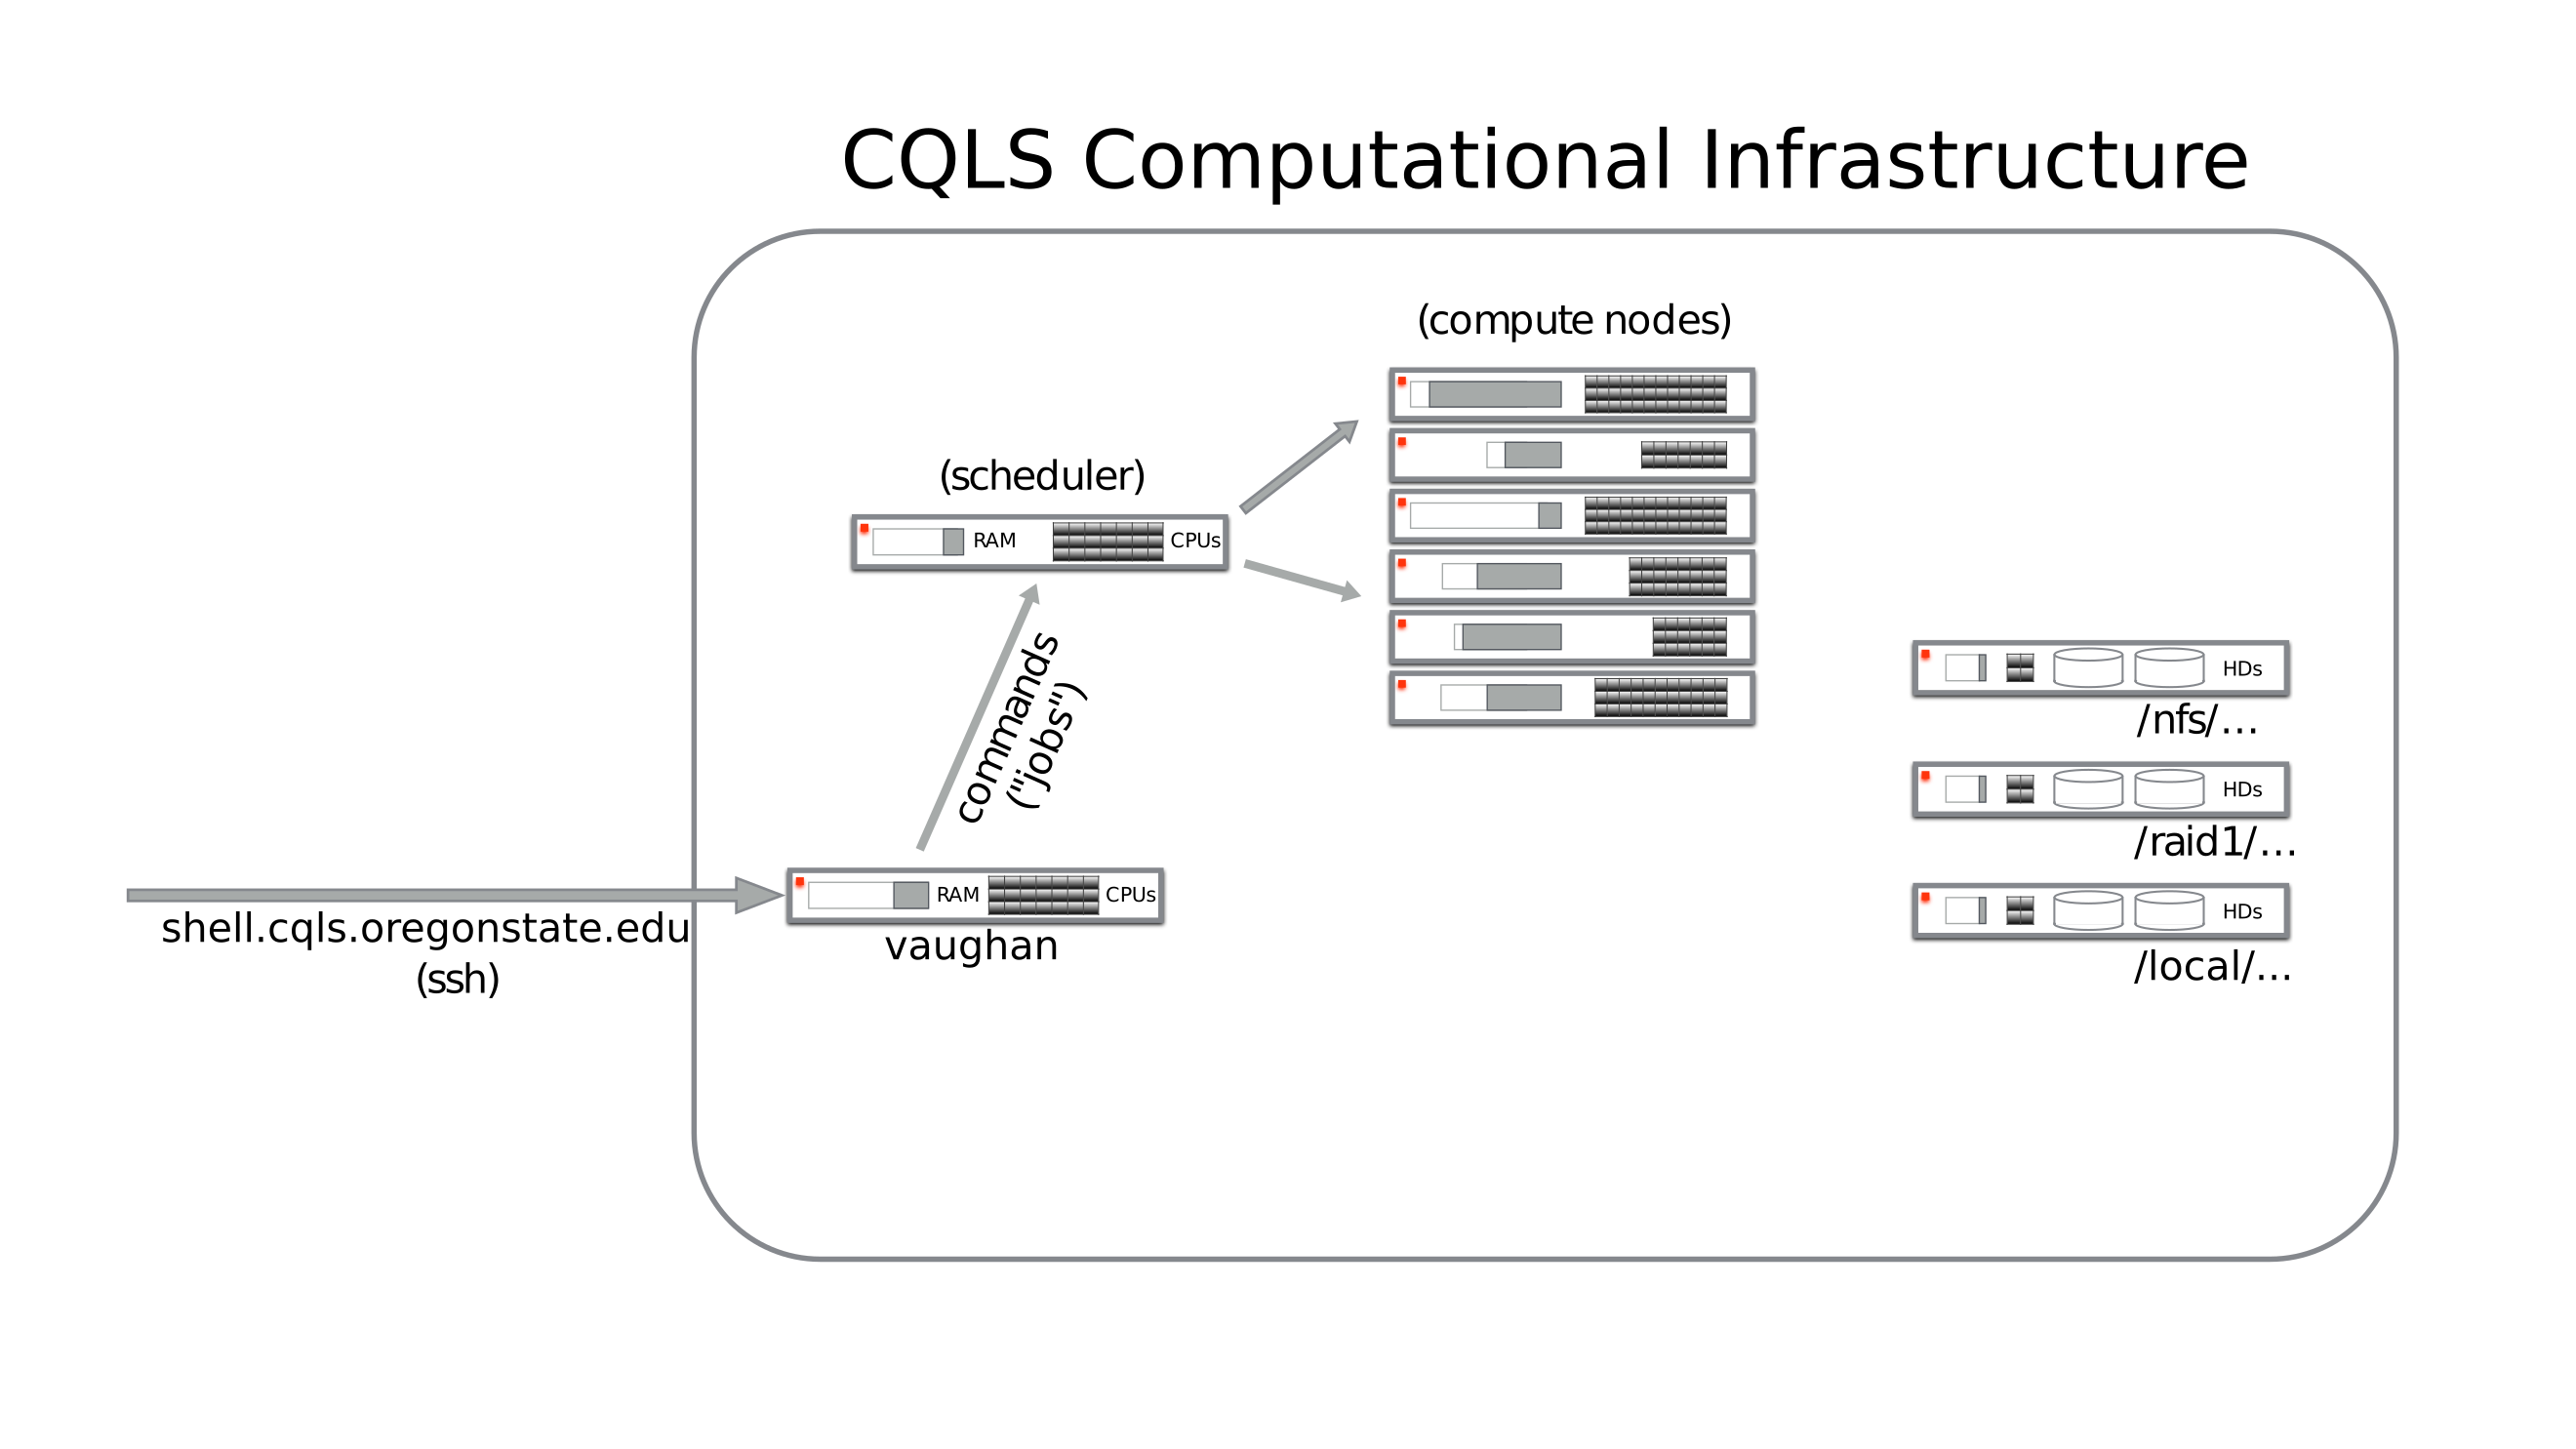
Now you know where programs are and where you are going to store the data. The last piece of data you need is how to submit a job to the Son of Grid Engine (SGE AKA successor to Sun Grid Engine) queuing system. Some basic information is found here:
https://arc.liv.ac.uk/SGE/howto/basic_usage.html
| Command | Purpose | Notes |
|---|---|---|
| qstat | Check status of running jobs; queue information | Specify -u ‘*’ for all users.; qstat -g c -U |
| qsub | Submit script containing configuration & shell commands | Use SGE_Array or SGE_Batch for wrappers |
| qhost | Shows information about each compute node | |
| qrsh/qlogin | Submits shell or login commands | qrsh with no arguments submis a qlogin request |
| qacct | Allows querying of finished jobs | qacct -u <username> -d 7 -j -E shows jobs finished in the last 7 days |
In order to make things easier for our users, we have provided three scripts to help with job submission and queue maintanence:
| Wrapper | Purpose | Notes |
|---|---|---|
| SGE_Batch | Submits a single job to the queue | Must provide -r flag where the standard error/output will go; -c will take a quoted set of commands or an executable shell script as an option |
| SGE_Array | Submits many jobs from a text file to the queue | Useful when submitting a lot of similar type of job at once |
| SGE_Avail | Shows queueing resources available to you at this time | Specify alternative user with the -u flag |
All resource intensive commands should be run through the queueing system. Moving/copying files, editing text files, and setting up shell scripts are fine to do from waterman, but everything else should be done on a compute node through SGE.
In order to check out a node for interactive use, you can use the qrsh
command as listed above. To check out multiple processors at once on a
machine, use the qrsh -pe thread N and replace N with the number of
processors you’d like to check out.
Please exit the node when you are finished so that those resources can be reclaimed by the queue.
Hey, without a graphical interface, how do I even edit a text file?!
Relevant section of the primer
I know, this was a problem for me too. You have several options:
nano, emacs, and vi(m) are the three primary command-line text editors. They are listed, arguably, in order of learning curve, from easiest to hardest. I would encourage everyone who plans to live on the command-line for an extended period to attempt to use vim - it keeps your hands on the home row and allows you to have higher productivity. I understand there is a steep learning curve because I went through it myself, having used emacs for a long time prior to starting vim.
Here’s a place to get a vim config file for starters: https://github.com/amix/vimrc
There have been numerous articles discussing this, so you can search on Google about the editor wars. I’ll link two articles here to save you time.
Medium post, Linux training academy post
In the end, you’ll just have to pick something. If you are unhappy with your decision, then you can always switch to another option!
Can I run BLAST from the command-line?
Yes! We have set your $BLASTDB environment variable to
/nfs1/CGRB/databases/NCBI/latest_blast_DB for you. If you need to search
against the nt or nr databases, you can specify them as the -db flag for blastn
or blastp e.g. blastp -db nr -query query.fasta -outfmt 7 -out query_vs_nr.tab
to do a BLAST search against nr with a query sequence.
NOTE: BLASTDBs will be updated to v5 soon. You shouldn’t notice any discernable differences in usage, but if you do, let us know!
BLASTDBs have been updated to v5! The new location is:
/nfs1/CGRB/databases/NCBI/v5/latest_blast_DB
You should not have to change anything yourself to access these DBs, the env var has been changed for you.
See here for more info: https://ftp.ncbi.nlm.nih.gov/blast/db/v5/blastdbv5.pdf
Here’s an example BLAST command you can run on the infrastructure to give you an idea of how to use the SGE system.
|
|
Replace the -q micro with a queue that is available for you. This should take
around 14 minutes with 8 threads. You can check if the job is running with the
qstat command. I prefix all of my SGE jobs with sge. but it’s not
necessary.
One restriction on naming is that runids cannot start with a number;
sometimes when I generate automated runids using, for example, sample names,
that may start with numbers, having the sge. prefix ensures that each of the
runids are valid.
You’ll see something like this:
|
|
You’ll see a directory has been generated that has the same name as the runid that you’ve provided. Within the directory, there are files that contain the standard error and standard output of the job. Here’s the relevant section of the primer.
When the job is finished, you can see some stats about the run in the .e i.e.
Standard Error file. You can also examine the the stats about the run using
the qacct command e.g.
|
|
Now you should be able to get around the infrastructure and find your programs!
How do the compute nodes access the same data as on vaughan?

A router connects all of the compute nodes to the same data that is stored on networked drives. The networked drives are attached to several different servers that run the file system.
In this way, the same files one edits on vaughan are available on each compute node, and vice-versa.
How do I get data on and off the infrastructure?
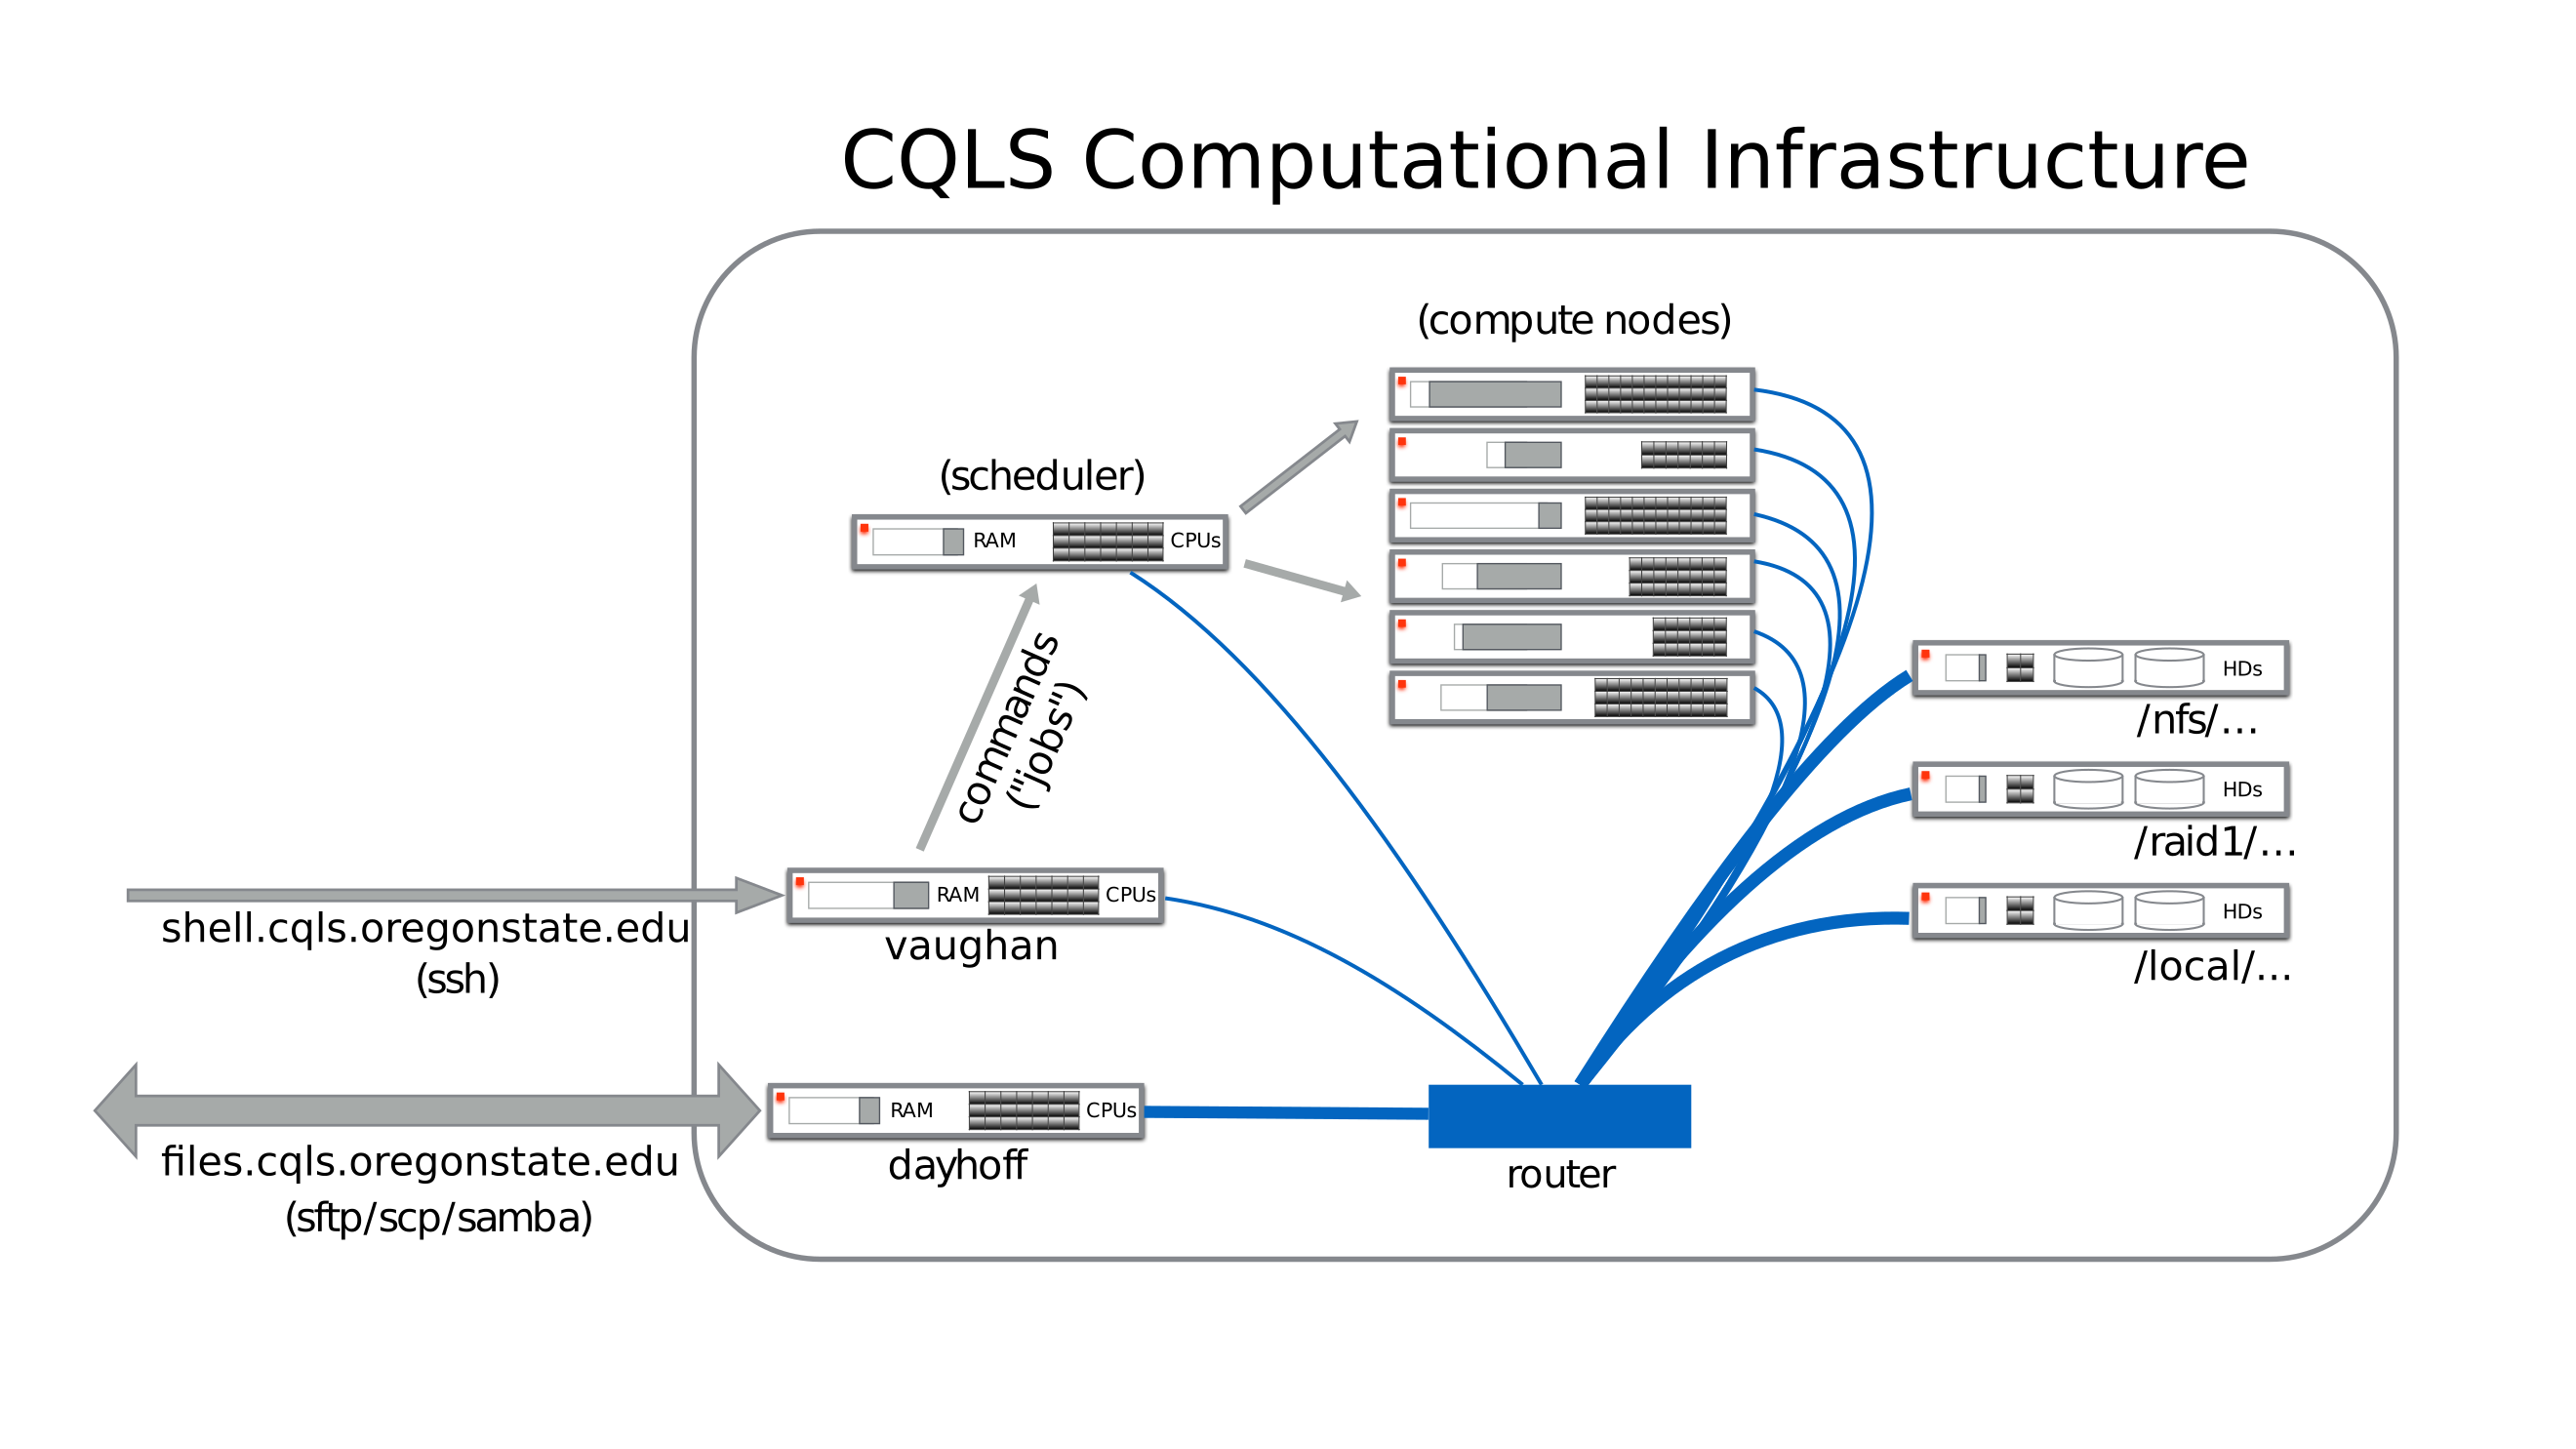
You can connect using sftp or scp to the files.cqls.oregonstate.edu
machine, aka dayhoff, to get your data on or off of the infrastructure. Please
do not run compute jobs on dayhoff, and submit those jobs to the queuing
system instead.
Feel free to contact me if you have specific questions.